FastDFS是一个轻量级的开源分布式文件系统,主要解决了大容量的文件存储和高并发访问的问题,文件存取时实现了负载均衡,实现了软件方式的RAID,可以使用廉价的IDE硬盘进行存储。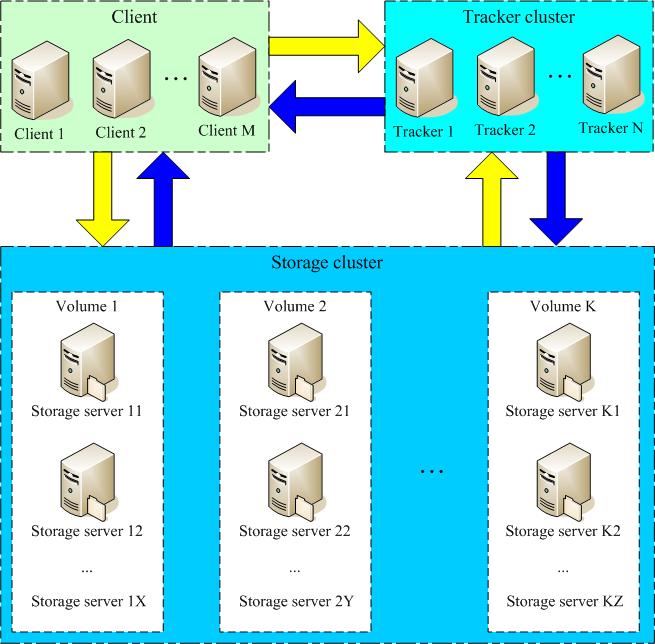
为FastDFS服务器建立和分配好相关的目录。包括:
- 总目录:/fastdfs
- Libevent安装目录:/fastdfs/默认解压目录
- FastDFS安装目录:/fastdfs/FastDFS
- Tracker目录:/fastdfs/tracker
- Storage目录:/fastdfs/storage
- Client日志目录:/fastdfs/client
安装所需的依赖包
shell> yum install make cmake gcc gcc-c++
安装libfatscommon
shell> cd /fastdfs
shell> unzip libfastcommon-master.zip
shell> cd libfastcommon-master
编译、安装
shell> ./make.sh
shell> ./make.sh install
安装FastDFS
shell> cd /fastdfs
shell> unzip fastdfs-master-V5.05.zip FastDFS
shell> cd FastDFS
编译、安装
shell> ./make.sh
shell> ./make.sh install
配置跟踪节点(192.168.1.200,192.168.1.201)
说明:每个节点执行相同的操作,复制tracker样例配置文件,并重命名
shell> cp /etc/fdfs/tracker.conf.sample /etc/fdfs/tracker.conf
修改tracker.conf配置文件
shell> vim /etc/fdfs/tracker.conf
修改的内容如下:
disabled=false              # 启用配置文件
port=22122                  # tracker服务器端口(默认22122)
base_path=/fastdfs/tracker  # 存储日志和数据的根目录
复制
shell> cp /etc/fdfs/tracker.conf /fastdfs/FastDFS/conf/tracker.conf
其它参数保留默认配置, 具体配置解释可参考官方文档说明:http://bbs.chinaunix.net/thread-1941456-1-1.html
创建base_path指定的目录
shell> mkdir -p /fastdfs/tracker
防火墙中打开tracker服务器端口( 默认为 22122)
shell> vi /etc/sysconfig/iptables
添加如下端口行:
-A INPUT -m state --state NEW -m tcp -p tcp --dport 22122 -j ACCEPT
重启防火墙:
shell> service iptables restart
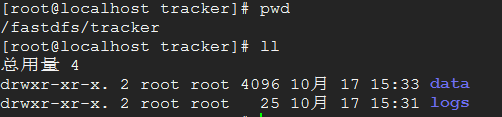
启动tracker服务器
shell> /etc/init.d/fdfs_trackerd start
初次启动,会在/fastdfs/tracker目录下生成logs、data两个目录:
检查FastDFS Tracker Server是否启动成功:
ps -ef | grep fdfs_trackerd

停止tracker服务器
shell> /etc/init.d/fdfs_trackerd stop
设置tracker服务开机启动
shell> chkconfig fdfs_trakcerd on
配置存储节点
group1: 192.168.1.202,192.168.1.203
group2: 192.168.1.204,192.168.1.205
说明:每个节点执行相同的操作,复制storage样例配置文件,并重命名
shell> cp /etc/fdfs/storage.conf.sample /etc/fdfs/storage.conf
编辑配置文件
shell> vi /etc/fdfs/storage.conf
修改的内容如下:
disabled=false                      # 启用配置文件
port=23000                          # storage服务端口
group_name=group1                   # 组名(第一组为group1,第二组为group2,依次类推...)
base_path=/fastdfs/storage          # 数据和日志文件存储根目录
store_path0=/fastdfs/storage        # 第一个存储目录,第二个存储目录起名为:store_path1=xxx,其它存储目录名依次类推...
store_path_count=1                  # 存储路径个数,需要和store_path个数匹配
tracker_server=192.168.0.200:22122  # tracker服务器IP和端口
tracker_server=192.168.0.201:22122  # tracker服务器IP和端口
http.server_port=8888               # http访问文件的端口
复制
shell> cp /etc/fdfs/storage.conf /fastdfs/FastDFS/conf/storage.conf
其它参数保留默认配置, 具体配置解释可参考官方文档说明:http://bbs.chinaunix.net/thread-1941456-1-1.html
创建基础数据目录
shell> mkdir -p /fastdfs/storage
防火墙中打开storage服务器端口( 默认为 23000)
shell> vi /etc/sysconfig/iptables
添加如下端口行:
-A INPUT -m state --state NEW -m tcp -p tcp --dport 23000 -j ACCEPT
重启防火墙:
shell> service iptables restart
启动storage服务器
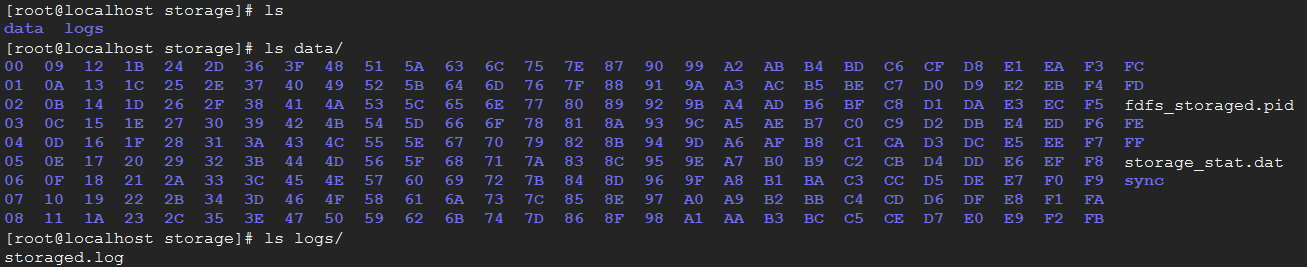
shell> /etc/init.d/fdfs_storaged start
初次启动,会在/fastdfs/storage目录下生成logs、data两个目录。
检查FastDFS Tracker Server是否启动成功:
ps -ef | grep fdfs_storaged

各节点启动后,使用tail -f /fastdfs/storage/logs/storaged.log命令监听存储节点的日志,可以看到存储节点链接到跟踪服务器,并提示哪一个为leader跟踪服务器,同时也能看到同一组中其它节点加入进来的日志信息。
所有存储节点都启动之后,可以在任一存储节点上使用如下命令查看集群的状态信息:
shell> /usr/bin/fdfs_monitor /etc/fdfs/storage.conf
停止storage服务器
shell> /etc/init.d/fdfs_storaged stop
设置storage服务开机启动
shell> chkconfig fdfs_storaged on
文件上传测试,修改tracker服务器client.conf配置文件
shell> cp /etc/fdfs/client.conf.sample /etc/fdfs/client.conf
shell> vi /etc/fdfs/client.conf
base_path=/fastdfs/tracker
tracker_server=192.168.1.200:22122
tracker_server=192.168.1.201:22122
复制
shell> cp /etc/fdfs/client.conf /fastdfs/FastDFS/conf/client.conf
执行文件上传命令
shell> /usr/bin/fdfs_upload_file /fastdfs/FastDFS/conf/client.conf /fastdfs/FastDFS_v5.08.tar.gz
返回以下ID号,说明文件上传成功:
group1/M00/00/00/rDMECFtVUyaAczWlAAVCLEPUQWI.tar.gz